There are nights when a sweet craving doesn’t just knock on the door—it kicks it down. I had one of those nights last week. After a long Tuesday, all I wanted was something deeply, ridiculously chocolatey, but the thought of pulling out a mixer, multiple bowls, and preheating the oven felt like climbing a mountain.
In a moment of desperation, I grabbed a mug, some keto pantry staples, and crossed my fingers. What happened next was pure magic. In less than 10 minutes, I was holding a warm, decadent, molten chocolate lava cake that tasted like it came from a fancy restaurant. No mess, no sugar crash, just pure, gooey bliss.
This isn’t just a recipe; it’s a solution. It’s for those moments you need an emergency dose of comfort, a quick dessert for a date night in, or just a treat-yourself moment without derailing your goals.
Why This Recipe Is a Game-Changer
I know there are a lot of mug cake recipes out there, but this one truly stands out. Here’s why I think you’ll fall in love with it:
One-Bowl Simplicity: I’m serious. Everything comes together in a single microwave-safe bowl. This means cleanup is practically nonexistent, which is a huge win in my book.
Insanely Fast: From gathering your ingredients to taking that first glorious bite, you’re looking at about seven minutes. It’s faster than ordering dessert for delivery and infinitely more satisfying.
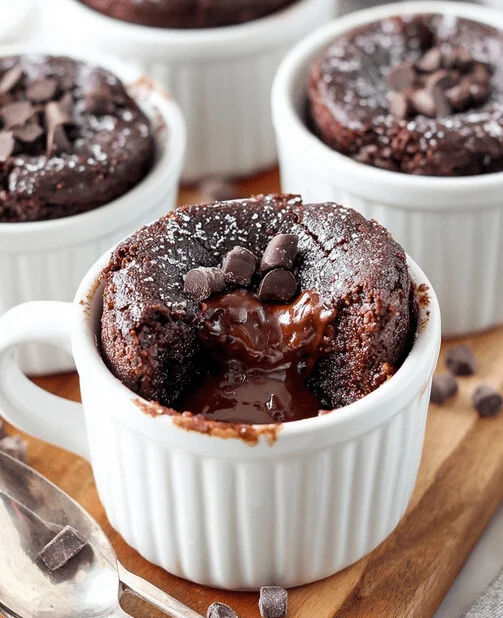
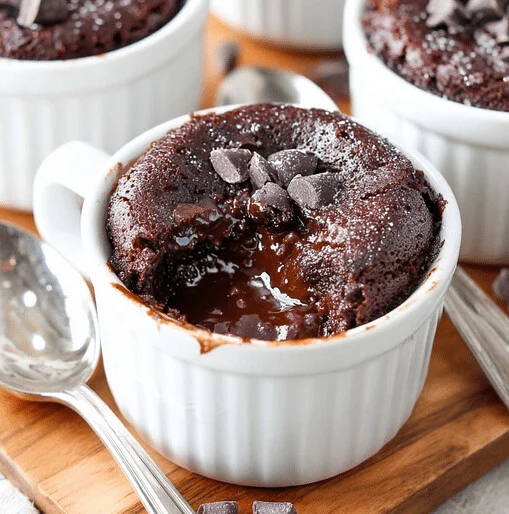
Rich, Indulgent Flavor: This cake doesn’t taste “keto.” It’s rich, dark, and perfectly sweet, with that incredible river of molten chocolate in the center. It’s the real deal.
What You’ll Need
The ingredients are simple keto staples you might already have on hand. Here’s a quick look at the lineup:
Dutch-Processed Cocoa Powder: Using Dutch-processed cocoa gives a richer, darker, and less bitter chocolate flavor than regular cocoa powder. It makes a huge difference!
Powdered Monk Fruit-Erythritol Blend: It has to be powdered! Granulated sweeteners won’t dissolve in the short cooking time, leaving you with a gritty texture.
Fine Sea Salt: Just a pinch is all you need to elevate the chocolate flavor from flat to fantastic.
Unsalted Butter: This adds richness and a tender crumb to the cake.
Large Eggs: Make sure they’re at room temperature! This helps them mix into the batter smoothly for a perfect texture.
Heavy Whipping Cream: Adds a little extra fat and moisture, making the cake super luxurious.
Vanilla Extract: A non-negotiable for rounding out the flavor of any baked good.
Sugar-Free Dark Chocolate: This is for the molten core! Use a good quality chocolate bar you love to eat on its own, and give it a rough chop.
Step-by-Step to Molten Perfection
Create the Base: In a medium microwave-safe bowl, melt your butter (about 30-40 seconds). Add the cocoa powder, powdered sweetener, and salt right on top. Whisk it all together until you have a thick, glossy paste. It’s going to look like the most amazing frosting!
Smooth Out the Batter: Add the room-temperature eggs one at a time, whisking well after each one. This is key to getting a smooth, not lumpy, batter. Once the eggs are in, pour in the heavy cream and vanilla and whisk one last time until everything is uniform and beautiful.
Portion It Out: Divide the batter evenly among your three mugs or ramekins. They should be about half to two-thirds full, leaving a little room for them to puff up.
Make the Molten Core: Press a portion of your chopped chocolate into the center of each cake. Just push it down until it’s barely covered by the batter. Don’t worry, it’ll sink as it cooks to create that perfect lava flow.
The Magic Minute: Microwave the cakes one at a time on full power for 75 to 90 seconds. The trick is to pull it out when the edges are set but the very center still looks a little wet and jiggly. This is the secret to the lava!
Let It Rest! This is a crucial step. Let the cake rest for a full minute after it comes out of the microwave. This allows the center to finish setting up into a perfect molten sauce instead of a liquidy mess.
Expert Tips for Success
Making It Your Own: Want a mocha vibe? Add ½ teaspoon of instant espresso powder with the cocoa. Not a fan of dark chocolate? Use sugar-free milk chocolate for the center for a sweeter, creamier lava.
How to Store (If You Have Leftovers): These are definitely best eaten immediately. But if you need to, you can cover and refrigerate them for up to two days. The center will solidify, but you can revive it with a quick 20-30 seconds in the microwave.
Common Mistakes to Avoid: The biggest mistake is overcooking. If your cake is dry, you went too long. Every microwave is different, so start checking at 70 seconds. Remember, a slightly underdone center is the goal!
Serving and Pairing Ideas
These little cakes are incredible on their own, but if you want to dress them up, go for it! A dollop of keto-friendly whipped cream or a scoop of low-carb vanilla ice cream is a classic choice. For a pop of color and freshness, add a few fresh raspberries or sliced strawberries.
For the perfect pairing, enjoy it with a cup of black coffee or a glass of unsweetened almond milk. On a chilly evening, it’s absolutely divine. This is the perfect dessert for a cozy night in, a quick treat for guests, or any time you deserve something special.
A rich molten chocolate cake ready in minutes. This single-bowl treat delivers a gooey center with no added sugar, perfect for a quick low-carb dessert.
About 3 oz (85 g high-quality sugar-free dark chocolate, roughly chopped)
Butter or nonstick spray (for greasing)
Instructions
Grease the ramekins or mugs. In a microwave-safe bowl, melt the butter 30 to 40 seconds on high, then let it cool 1 minute.
Whisk in the cocoa powder, powdered sweetener, and salt until a thick glossy paste forms.
Add the eggs one at a time, whisking well after each. Whisk in the cream and vanilla until smooth and slightly aerated.
Divide the batter evenly among the three ramekins, filling each half to two thirds full.
Press one third of the chopped chocolate into the center of each portion, just below the surface.
Microwave one at a time on full power 60 to 100 seconds in a 1000 W microwave, starting at 60 seconds. The cake should pull from the sides and the center should look soft and slightly glossy. If needed, continue in 10 to 15 second bursts.
Rest 1 minute. Serve immediately. Optionally invert onto a small plate.
Notes
For deeper flavor, add ½ tsp instant espresso powder with the cocoa.
Choose sugar-free chocolate without maltitol when possible.
Ideal doneness: edges set, center jiggly not liquid.
Food safety: for a molten center use pasteurized eggs. If using regular eggs, cook until the center reaches 71°C which will reduce fluidity.
Best enjoyed fresh. Refrigerate leftovers up to 2 days. Reheat 20 to 30 seconds.
Serve with unsweetened whipped cream, a few berries, or a light dusting of powdered sweetener.
Nutrition Facts (1 of 3 cakes):Calories: 463 kcal | Total Fat: 39.5 g (Saturated Fat: 23.2 g) | Total Carbs: 52.9 g (Fiber: 10.2 g, Net Carbs: 10.7 g) | Protein: 14.5 g | Sodium: 284 mg
These values are approximate and may vary based on ingredients and preparation.
Nutrition
Calories:463
You Have to Try This!
Honestly, this recipe has become a staple in my house for a reason. It’s so easy, so satisfying, and feels like such an indulgence. I hope you give it a try the next time a chocolate craving hits.
If you make it, I’d love to see it! Let me know how it turned out in the comments below. Happy baking!
Hi, I’m Emily! As a wellness researcher and recipe developer, my mission is simple: to bridge the gap between nutritional science and the joy of eating. Here, you’ll find evidence-based recipes that feed your body without boring your tastebuds. Read her full story.


")
")


")
")